Guide
Table of contents
- Prerequisites
- Configure Lightstep
- Update the OTEL Collector to use the Service Graph compatible version
- Deploy Helm Chart
- Configure the Lightstep Service Graph Connector
- View Services & Relationships
Prerequisites
Microservice Observability
Implement the Microservice Observability Solution.
Install the Lightstep Service Graph Connector
Lightstep Service Graph Connector enables teams to automatically discover services and relationships across platforms and send them to ServiceNow to ensure a complete view of your environment. Installation is as follows:
-
Login to your SN Instance as Administrator
-
Navigate to the System Definition > Plugins and install or activate the following plugins:
Plugin Name Plugin ID Service Graph Connector for Observability - Lightstep v1.0.1 sn_sg_lightstep
Configure Lightstep
Create Lightstep Stream
-
Browse to Lightstep App
-
Select your Project (e.g. dev, prod, or other)
-
Navigate to Streams
-
Create a Stream (e.g.
mystream) -
Click on your Stream
-
Note and safeguard your Stream ID from the URL as shown below:

Get Lightstep Information
-
Browse to Lightstep App
-
Select your Project (e.g. dev, prod, or other)
-
Navigate to Settings
-
Note and safeguard your
Organizationand yourProjectidentifiers. -
Navigate to Settings > Access Tokens
-
Safeguard your
Access Token -
Navigate to Account > Account Settings > API Keys
-
Create and safeguard an API Key as follows:
Field Value Description Any memorable description (e.g. srecon22)Role Member
Update the OTEL Collector to use the Service Graph compatible version
Update the Lightstep configmap
-
Start a Bash Shell
-
Configure kubectl environment variable
export KUBECONFIG=$HOME/.kube/config-aks -
Set kubectl context for AKS (See Example below)
kubectl config use-context olympus -
Test AKS Cluster Connection
 kubectl cluster-info
 kubectl get nodes -A
-
Set Lightstep Access Token Environment Variable
export LS_ACCESS_TOKEN=YOUR LIGHTSTEP ACCESS TOKEN export LS_STREAM_ID=YOUR LIGHTSTEP STREAM ID export LS_API_KEY=YOUR LIGHTSTEP API KEY export LS_ORG_ID=YOUR LIGHTSTEP ORG ID export LS_PROJECT_ID=YOUR LIGHTSTEP PROJECT ID -
Update the Lightstep configmap
 kubectl apply -n cassandra -f - <<EOF
 kind: ConfigMap
 apiVersion: v1
 metadata:
   name: lightstep-configmap
 data:
   collector-config: |
     receivers:
       otlp:
         protocols:
           grpc:
           http:
       lightstep-streams/mystream:
         organization: "${LS_ORG_ID}"
         project: "${LS_PROJECT_ID}"
         api_key: "${LS_API_KEY}"
         window_size: 5m
         stream_id: "${LS_STREAM_ID}"
     processors:
       resourcedetection/azure:
         detectors: [env, azure]
         timeout: 2s
         override: false
     exporters:
       otlp:
         endpoint: ingest.lightstep.com:443
         headers:
           "lightstep-access-token": "${LS_ACCESS_TOKEN}"
       logging:
         loglevel: debug
       service:
         scraper:
           endpoint: 0.0.0.0:55688
     service:
       pipelines:
         traces:
           receivers: [otlp]
           processors: [resourcedetection/azure]
           exporters: [logging,otlp]
         traces/sgc:
           receivers: [lightstep-streams/mystream]
           processors: []
           exporters: [logging,service]
 EOF
Update Helm Chart
-
Sign In to GitHub
-
Select the Boutique Project (e.g.
cassandra) you configured earlier. -
Locate the
helm/templates/kubernetes-manifests.yamlfile -
Locate the Deployment section for the
otelcollector -
Un-Comment the
imagesection as follows:# image: otel/opentelemetry-collector-contrib:0.49.0 image: ghcr.io/lightstep/lightstep-partner-toolkit-collector:latest -
Expose Port
55688ports: - containerPort: 55688 # Add this entry -
Locate the Service section for the
otelcollector -
Expose Port
55688# Add this section - name: "55688" port: 55688 targetPort: 55688 -
Locate the Service section for the
otelcollector-external -
Un-Comment the Service as follows:
apiVersion: v1 kind: Service metadata: name: otelcollector-external spec: type: LoadBalancer selector: app: otelcollector ports: - name: "55688" port: 55688 targetPort: 55688 -
Commit changes
Deploy Helm Chart
Re-Deploy Application using Helm Pipeline
After the Lightstep instrumentation, we need to re-deploy the 10 Boutique application Pods along with the new Lightstep OTEL collector Pod to your Azure Kubernetes using the same provided kubernetes-deploy-all Helm Pipeline. Procedure is as follows:
-
Sign In to Azure DevOps
-
Select the Boutique Project (e.g.
cassandra) you configured earlier. -
Navigate to
Pipelines > All > azure-pipelines -
Select the
kubernetes-deploy-allPipeline -
Press
Run Pipeline -
Review Variables and press
Runas follows:Name Value Keep this value secret Let users override this value when running this pipeline SERVICE_NAMESPACE cassandraFalse True REPO_PREFIX YOUR DOCKER HUB ID False True -
Press
Run - Monitor the Pipeline and make sure it runs successfully
Check OTEL Collector Deployment
-
Start a Bash Shell
-
Start a Bash Shell
-
Configure kubectl environment variable
export KUBECONFIG=$HOME/.kube/config-aks -
Set kubectl context for AKS (See Example below)
kubectl config use-context olympus -
Test AKS Cluster Connection
kubectl cluster-info kubectl get nodes -A -
Retrieve the
otelcollector-externalservice EXTERNAL-IPkubectl get service otelcollector-external -n cassandra -
Browse to the
http://EXTERNAL-IP:55688to view the OTEL Collector JSON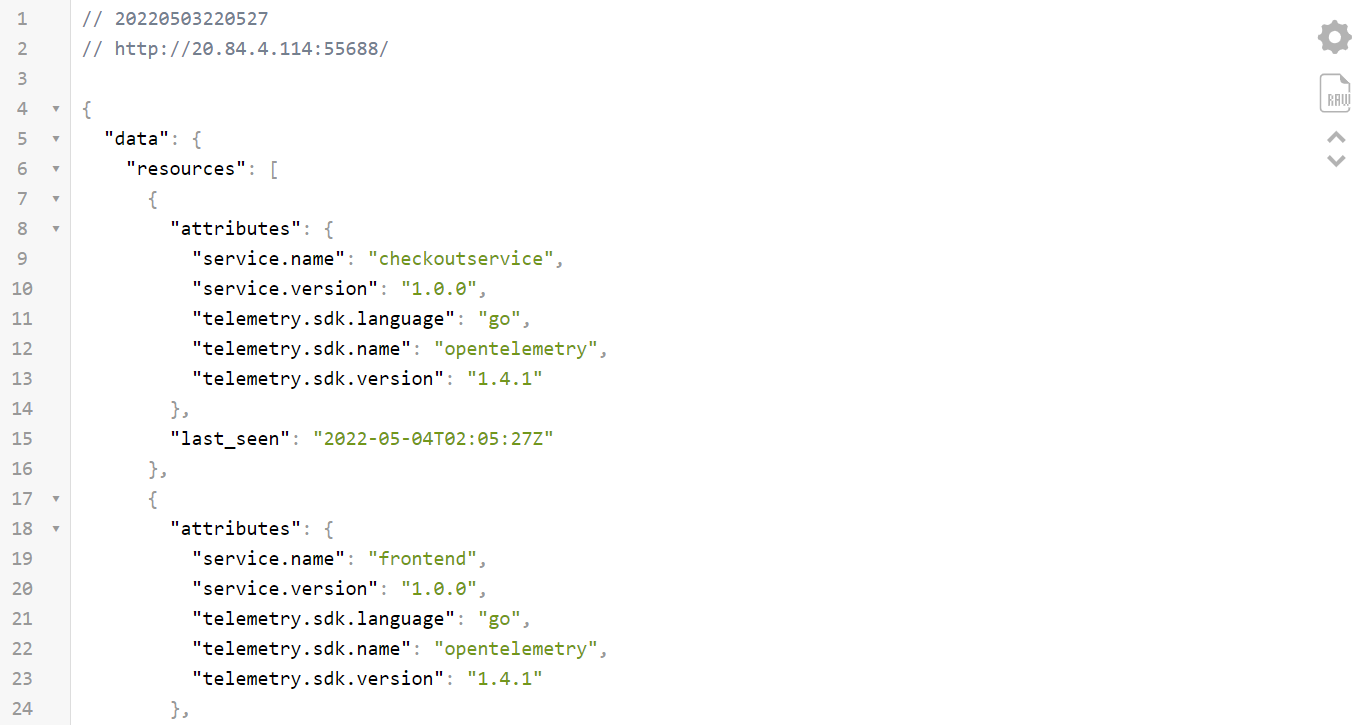
Configure the Lightstep Service Graph Connector
-
Login to your SN Instance as Administrator
-
Navigate to the SG Connector for Observability Lightstep > Setup
-
Configure the Setup > Set your Organization and Project Task fields as follows:
Field Value u_lightstep_project YOUR LIGHTSTEP PROJECT ID u_lightstep_organization YOUR LIGHTSTEP ORG ID -
Configure the Setup > Set your API Key Task fields as follows:
Field Value Name Some memorable name (e.g. srecon22)srecon22 YOUR LIGHTSTEP API KEY -
Configure the Setup > Configure OpenTelemetry Task fields as follows:
Field Value Host YOUR OTEL COLLECTOR EXTERNAL-IP Override default port 55688Protocol http -
Configure the Setup > Test the Connection to test connection.
-
Configure the Setup > Set up Scheduled Import Jobs Task fields as follows:

NOTE: Set all Jobs
Active=True -
Navigate to the SG Connector for Observability Lightstep > Scheduled Data Imports
-
Select the
SG-OpenTelemetry Resources Scheduled ImportJob. -
Manually trigger the Job by pressing the
Execute Nowbuton.
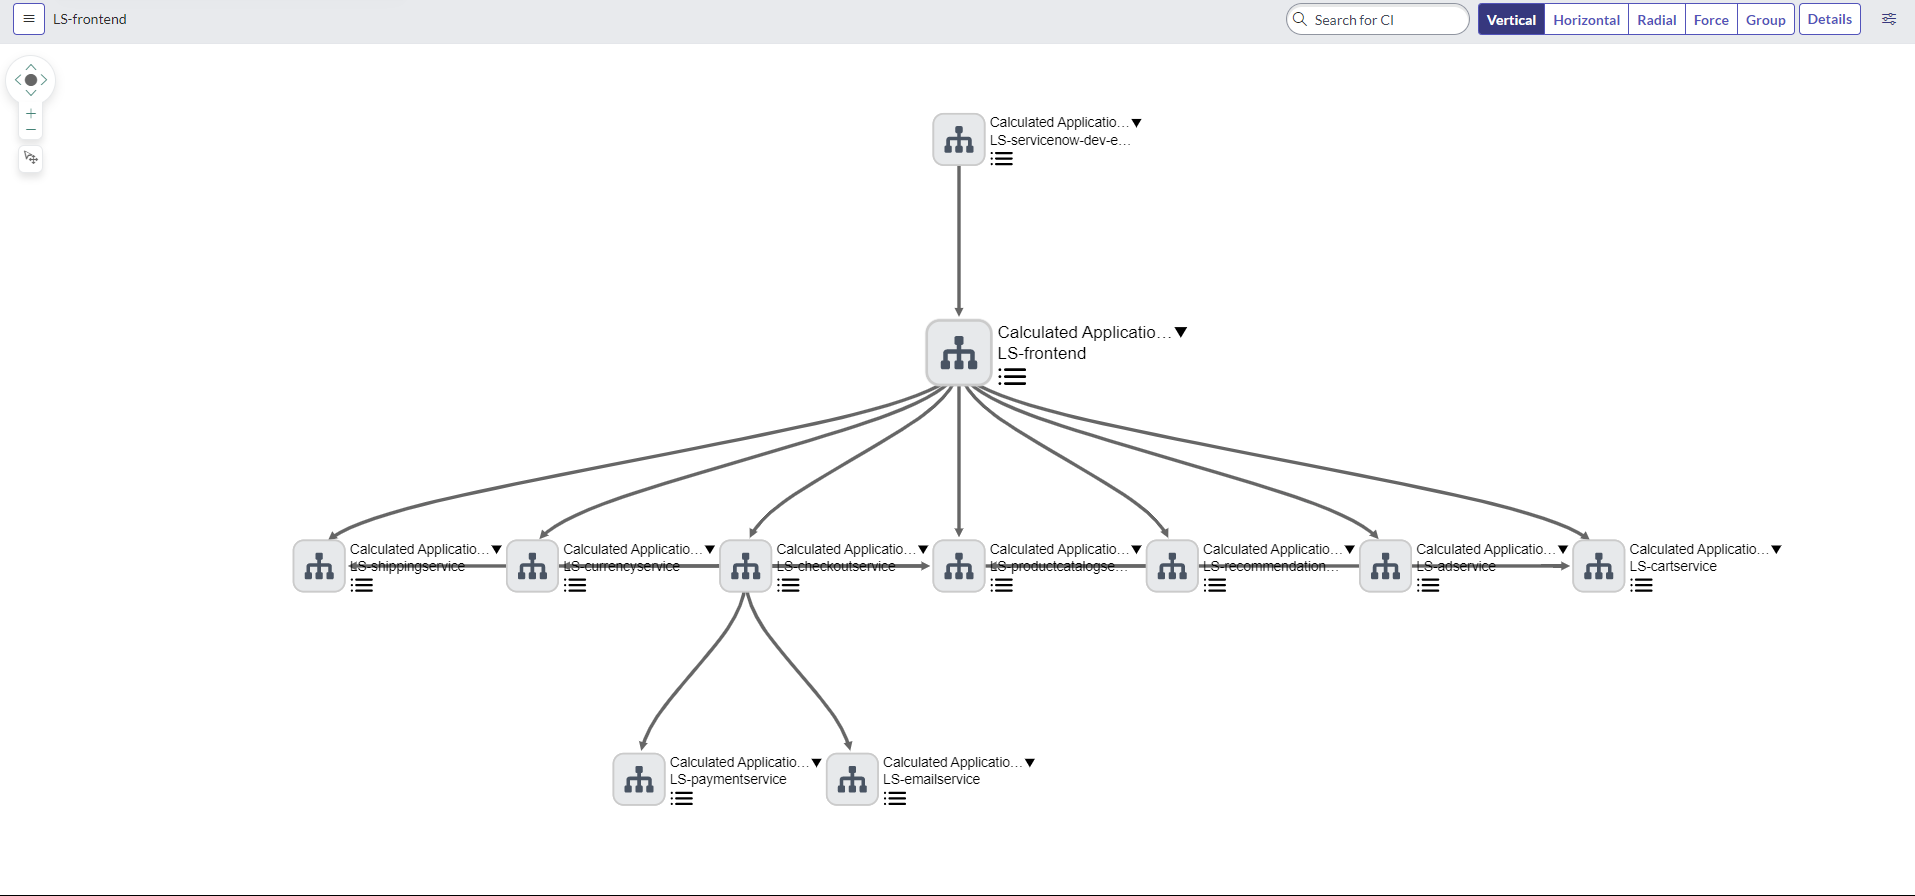
View Services & Relationships
-
Login to your SN Instance as Administrator
-
Navigate to the SG Connector for Observability Lightstep > Lightstep Services
-
Click on
View mapfor your Lightstep Project (e.g.LS-servicenow-dev-e95fa366)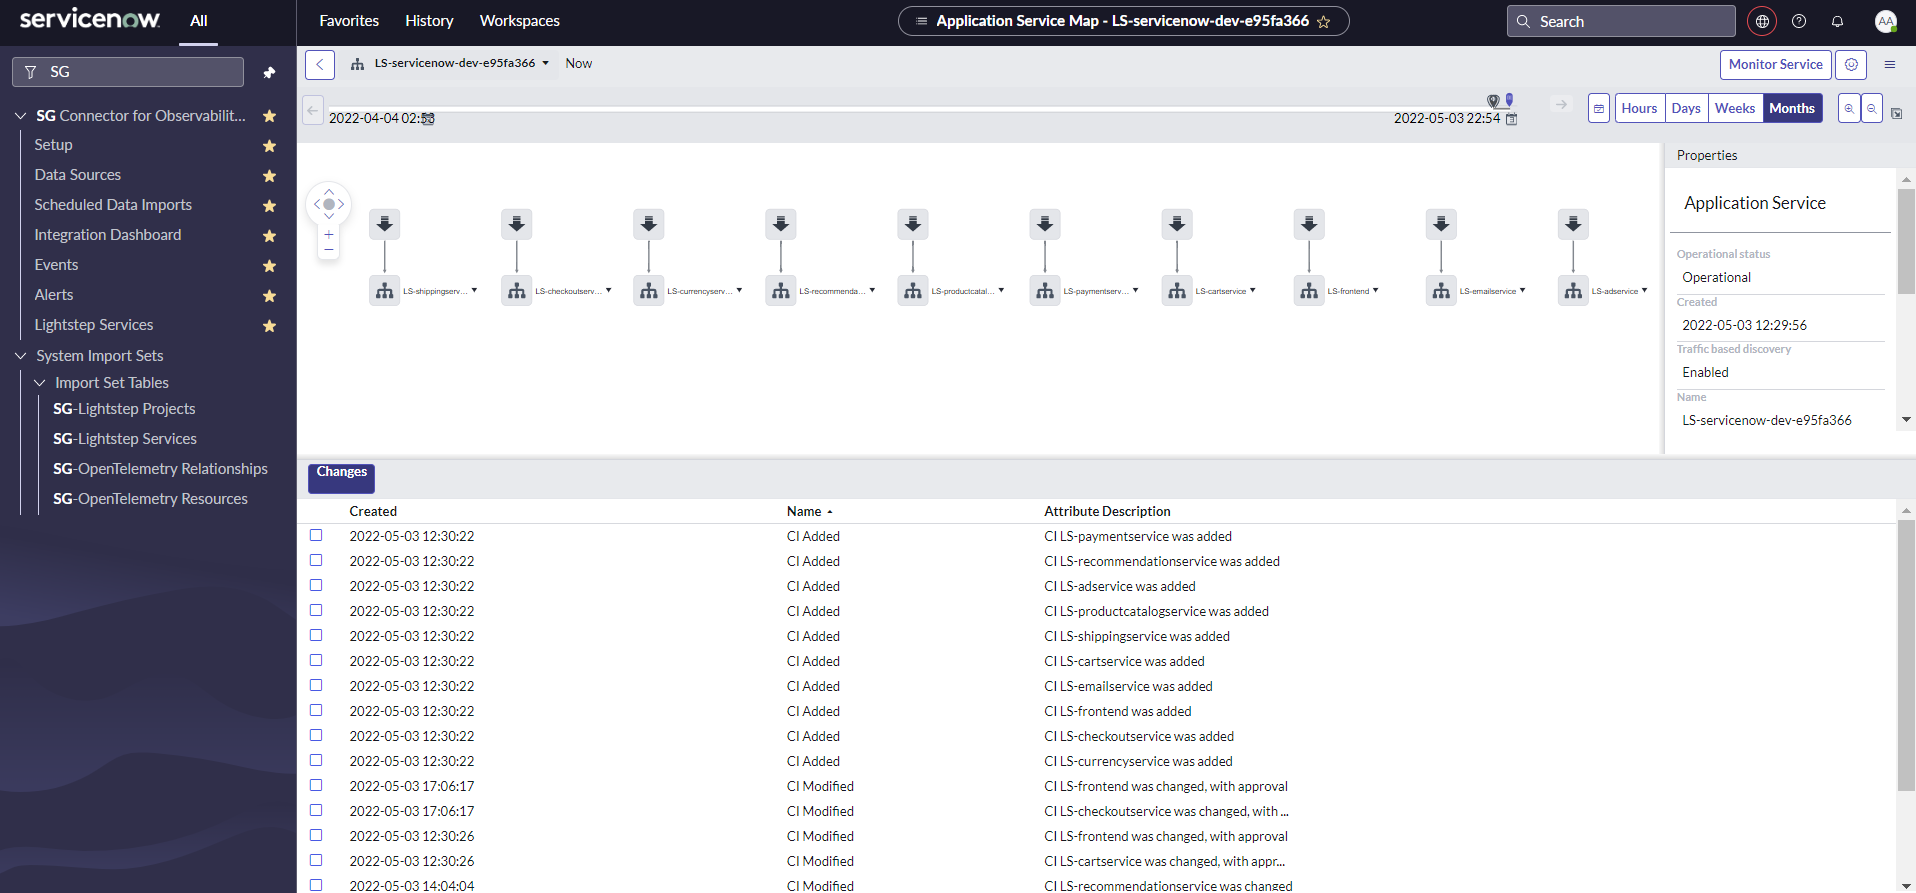
-
Right-Click on the
LS-frontendservice and selectOpen in Dependency Views.